B Online Learning was engaged by the Association of Independent Schools of NSW (AIS) to assist in building four modules in Articulate Storyline as part of the online component of the Early Literacy Project. This project aims to promote the explicit teaching of early literacy skills in independent schools.
The design for each module was provided to us by the AIS along with their specific requirements (for example, each module was colour coded), images, audio files as well as descriptions for interactions to be included. There were no quizzes at the end in these modules but interactivity for the participants was used appropriately throughout each module.
While some of the standard, Articulate Storyline quiz questions were used, there were several interactions that went beyond the capability of these templates. In this blog post, I want to share how I built three interactions that highlight the versatility and creativity that can be achieved using an eLearning authoring tool like Articulate Storyline.
Multiple True/False Questions on a Slide
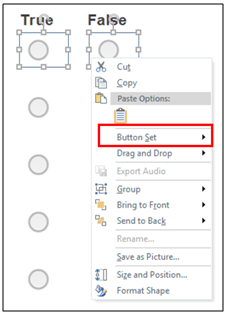
Usually, true/false questions only allow for one question to be built on each slide but in this case I needed to build five questions on the one slide along with feedback for individual incorrect answers as well as correct feedback when all five were answered correctly.
The layout was straightforward; each question was in its own text box (allowing me to space them out evenly) and I inserted two radio buttons per question for the answers (one for true and one for false).
As there were a lot of objects on the screen and because I’d need to create triggers to make the slide work how it needed to be, naming objects appropriately in the timeline was very important. Each question was named Q1, Q2 and so on while the radio buttons were named T1 and F1 for each question.
Because the radio buttons were inserted as objects, initially they could both be selected, which wasn’t ideal. So I used one of Storyline’s hidden features called ‘button sets’ which allow only one object in each set to be selected at any time (i.e. the true or false radio button). To create a button set I selected my T1 and F1 radio buttons, right-clicked my mouse and chose Button Set. I named my first button set Q1 and then repeated the process for the other four questions.
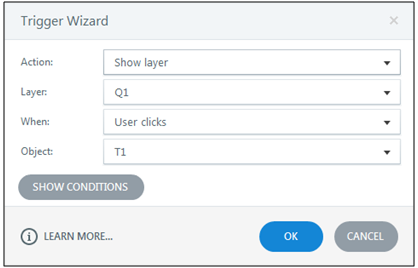
The way the question needed to work was that feedback was given if the user selected an incorrect option. This was achieved using layers and a trigger on each incorrect response, for example:
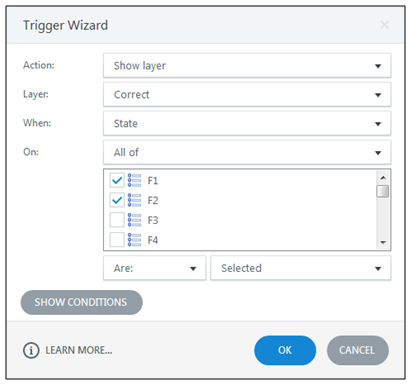
There also needed to be a correct layer for when all the correct responses were chosen. To do this I created a trigger based on the state of all of the correct answer radio buttons being selected:
While the standard True/False question does the work for you, a similar style of interaction can be achieved by building each of the required components. If it wasn’t for button sets, I would have had to add lots more triggers to make the interact work the way I needed it to.
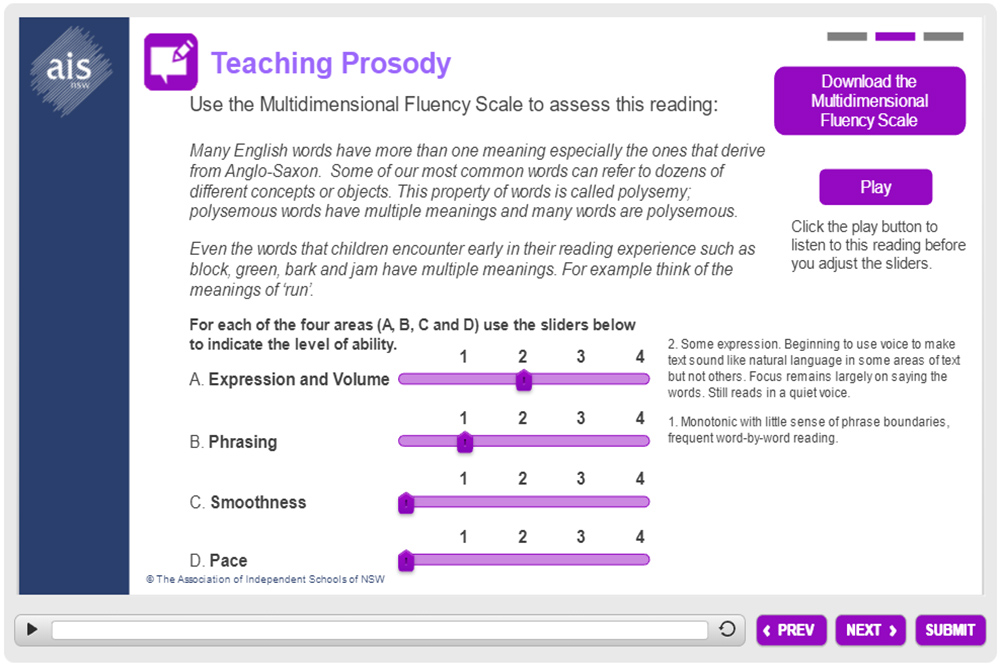
Multiple Sliders and a Submit Button
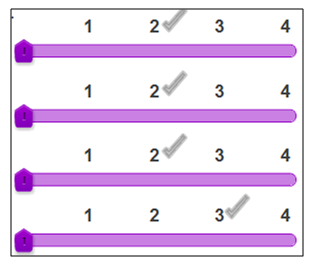
For this interaction, users needed to read the above text (or listen to a recorded version by clicking the Play button) and then using the Multidimensional Fluency scale, assess the level of ability of this reading against four areas by moving each slider to the correct position. Users were only permitted to have two attempts and for each attempt, a green tick was to be displayed for any responses that were correctly selected.
This was a real head scratcher for me! I had put my thinking cap on and after some trial and error and talking to my colleagues, this is what I came up with.
I firstly created three layers – one for the correct sequence of slider positions (correct layer), another if they didn’t get all of them on the first attempt (try again layer) and a third if they still didn’t select the correct combination on the second attempt (incorrect layer). Then I created a number variable that I would use to ‘count’ the number of times the user clicks the Submit button and based on the count, a different layer would show.
The correct sequence of numbers for each slider was A = 2, B = 2, C = 2 and D = 3. Initially, I thought that I could just make my triggers to show the correct layer be: show the correct layer when the user clicks the Submit button if each of the sliders were in their correct positions but I couldn’t get that to work properly.
Then I tried using a true/false variable (one for each area) that started with a false but changed to true when the slider was in the correct position. This worked better but it wasn’t consistent and I couldn’t work out why.
It turned out that if the slider went past the correct position (i.e. 2, 2, 2 and 3) the variable was changing to true, so if the positions ended up being 3, 3, 3 and 4 the correct layer was showing. What I had to do was this:
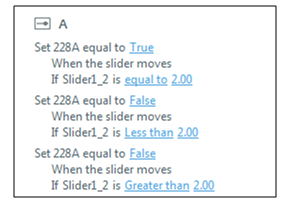
That way, if the user moved the slider past the position (or past then back again) the variable would change back to false if needed. I did this for the other three sliders and that worked provided the user got the positions right on the first attempt but we were giving the user two attempts. Now it was getting tricky!
Because there were four possible choices on each row and a user could get one row correct and the others incorrect (and there were multiple incorrect positions) I had to create 15 variations of the below trigger to cater for all of the possible true/false combinations: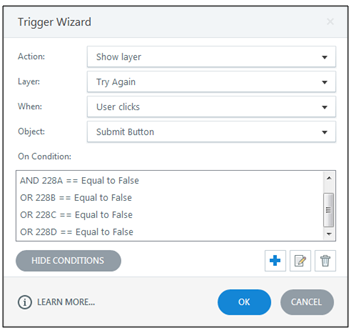
The condition on each was that the number variable was equal to 1. I needed to do this again to cater for the second attempt but I was able to copy and paste each trigger and adjust the layer name and change the count to 2 which saved heaps of time!
Hooray it was now working! But I wasn’t quite finished yet. I also needed to make a green tick appear to show which areas were correct for each attempt. I started by inserting a green tick next to each correct position and changing the initial state to hidden:
The true/false variable came in handy here because I could add some additional triggers when any of the layers were showing:

Now my interaction was complete and working the way it was supposed to!
Turning Cogs
Ok, so this isn’t an interaction but I had to try a few things to get it to work how it was supposed to. The requirements for the module were sent from the AIS in PowerPoint, which is a great tool because the PPT slides can be laid out as it would look on screen and the notes area can be used for additional information or instructions.
In the PPT, the purple cog spun first, then after a couple of seconds the green one did and then after a few more seconds the yellow cog would turn. In PPT, you can animate an object but also put a delay on other on-screen objects meaning you can animate them after a certain time period. Unfortunately, the delay option isn’t available in Storyline so at first I just had each cog animate at the same time and the text would appear gradually to coincide with audio for the slide. I was able to use cue points to sync the text to the audio.
However, I needed to make the text and the cog appear in time with the audio so I just adjusted when each cog would appear on screen by moving it along the timeline. But the problem was that it when it appeared the rotation speed was different to the first cog that was already turning, so this wasn’t going to work.
Then one of my colleagues suggested that I put the green and yellow cogs on their own layer that way they would have their own timeline and I could make the timeline length the same on each layer which would keep the speed consistent. I thought I’d give it a go.
As I already had my cue points in place, I was able to create the following show layer trigger:
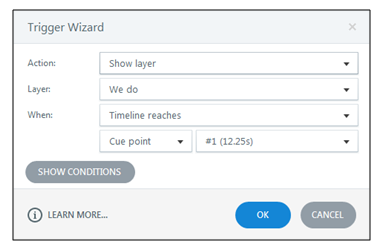
I did the same for the other layer, aligning it to cue point 2 and the third layer to cue point 3 and it worked!
The only other thing I needed to be mindful of was to try and get the cogs spinning at the same speed. The first cog needed to turn for 37 seconds which was the length of the entire audio file for the slide. If I made the timeline on the layers the same as the length of time the cog was displayed it would be less than this and the cog would appear to spin faster. So I made the timeline on each layer the same length as the base layer and all the cogs spun at the same speed.
These interactions show that you don’t always have to use the built-in templates especially if they aren’t suitable for what you want to achieve. With a little creative thinking, you can build your own interactions and create a much better experience for the end user.
You may be intersted in our other blog posts:
