There’s lots of options for changing the configuration and design of the Player in Storyline and here’s some of my favourite customisation tips!
Moving Player Tabs
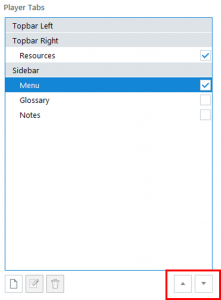
As you may know, the features displayed in the Player – such as the Menu or Resources – are turned on (and off) by clicking in the checkbox next to the item. But did you know that when the item is selected, you can move it to a different position in the topbar? (the left or right side) or to the sidebar by using the up and down arrows under the player tabs box:
This means that you don’t have to have the menu sitting to the side, it can be incorporated in the topbar for a cleaner look.
Creating New Player Tabs
The Resources, Menu, Glossary and Notes are the default tabs in Storyline but you can create new Player tabs by clicking on the new tab icon on the left:

Once you name your tab you can also add a trigger, for example you can jump to a URL or open a lightbox slide, when the tab is clicked on. One thing to note is that new tabs can only be positioned on the left or right of the topbar.
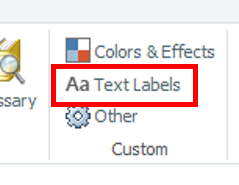
Renaming Player Items
Another way I like to customise the Player is by changing the names of the tabs. The default name for Player tabs (and all buttons and messages in Storyline) can be changed via the text labels button:
In this section of Player Properties, you’ll see two columns – in the left are all of the buttons and messages in Storyline and in the right is the text that’s displayed. Let’s say you want to rename the resources tab to ‘Takeaways’. First, you’ll need to find the Resources Tab in the left hand column (the items are listed in alphabetical order) and then when you find it, click in the right hand column and type in your new name:
If you click on the Update Preview button at the bottom of the screen, you’ll see the name change on the Player Preview.

Make sure that when you’ve finished customising the player that you click on the OK button at the bottom right to save your changes to the Player for your module.
Customising via Slide Properties
The features that you turn on via Player Properties will be applied to your entire project but you can turn off some features at the individual slide level via Slide Properties. Instead of using the ‘Player defaults’, choose ‘Custom for the selected slides’ from the dropdown and turn features off by unticking the checkbox.

For more ways to customise the Player, check out this tutorial from E-Learning Heroes: https://community.articulate.com/series/4/articles/customizing-the-player
What are your favourite Player customisation tips?
