
With Articulate 360, you have two options for recording screencasts on your computer. Replay has been around for a few years now whereas Peek is brand new and comes with an Articulate 360 subscription. So you may be wondering, what’s the difference between Peek and Replay? Lets take a look.
Peek
Peek is great for recording quick screencasts on your PC or Mac. You can share the recordings via Articulate 360 or you can download the recording and place it on your LMS. With Peek, there’s no options for editing your recording afterwards but you can get something crated and distributed quickly.
You can open Peek from the Articulate 360 desktop apps . . .

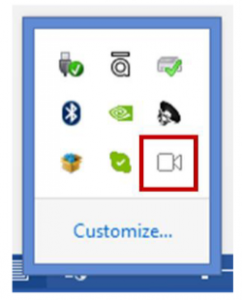
. . . or via the system tray in windows (or the Status Menu if you’re on a Mac).
When you first open Peek, you’ll see this window and its a good idea to click on the cog icon which will open up the Peek Preferences window.
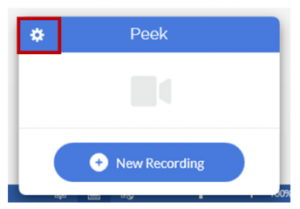
From here you can change the default key board shortcuts for pausing and ending your recording. When you click on New Recording you can choose to record any applications you have open. Recording with Peek is similar to recording via Storyline and you can narrate whilst recording if you have a microphone connected. When you’ve finished recording, you can upload it to Articulate 360 which will create a link for you to share with others. There will also be a copy saved to your computer in a Peek folder that is created in your Documents folder.
Replay 360
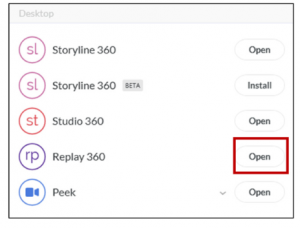
If you’re after some editing capabilities for your recording, then Replay 360 is what you’ll need. To open Replay 360 you’ll need to go to the Desktop applications in Articulate 360:
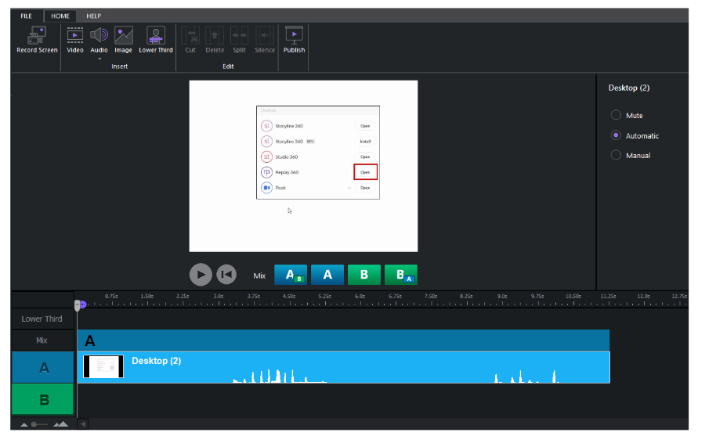
Recording using Replay 360 is just like doing a recording in Storyline (2 or 360) but unlike Peek, once you’ve recorded via Replay you’ll have several editing options:
- Cut: removes a section of the recording and joins either end of the cut section.
- Delete: removes a section of the recording but leaves a gap.
- Split: separates the recording.
- Silence: adds a section of silence or removes a section of audio not needed.
Another feature of Replay 360 is that you can import an existing video and use the above options to then edit your video. You can also add audio by recording it via a microphone or insert an audio file that was recorded somewhere else.
If you want to display the name of a speaker in your recording or add notes/tips to your screencast, then use the Lower Third option which inserts a semi-transparent graphic to the bottom of the recording. You’ll be able to set the duration that the information is displayed on screen.
Replay 360 has two tracks–an A track and a B track–so if you have a webcam on your computer and you wanted to record the speaker, it will be added to the B track with the screen recording in the A track. You can then control the mix and show just the speaker, just the screen recording or a combination of the two.
When you’ve finished editing your recording you have two publishing options–either upload the recording to Articulate 360 and share a link or to save the recording as an MP4 video file. If you want to use your recordings as part of a larger program both Peek and Replay 360 videos can be imported into in Storyline, Studio or Rise.
As the Articulate Certified training partner in Australia and New Zealand, B Online Learning runs courses in using all of the Articulate 360 applications. Click here to find out more.
